Creating and approving check requests in the Finch App is intuitive and easy. Select one of the topics below for detailed instructions about each step in the process.
Navigating the Landing Page
Our check request landing page is organized by the check status. You can toggle between all, saved, submitted, rejected, approved, processed, and printed.

REQUESTERS
Requesters will be able to see all check requests they have saved or submitted along with their current status. After submitting your check request, it will be approved or rejected by an Approver on your team before entering the last round of review by the accountants.
APPROVERS
Approvers will be able to see all check requests they have submitted as well as checks submitted by other Requesters in their organization. Approver check requests are automatically sent to the accountants for review and processing. Additionally, Approvers can review, modify, and approve or reject check requests submitted for approval in the “Submitted” tab.
STATUS UPDATES
All check request statuses are instantly updated with the exception of “Printed” statuses. “Printed” statuses update once daily. Possible statuses and their definitions include:
Saved: Not submitted, but ready for you to pick up where you left off in creating the request.
Submitted: Off to the next round of reviewers for approval.
Rejected: Not approved. You can go back and edit the check request to re-submit, or submit a new request entirely.
Processed: Approved by all rounds of approvers, and is set to be printed on our next check processing day.
Printed: Printed and will be mailed to the payee.
Submitting a Check Request
Submitting a check request through the Finch App is quick and easy. From the landing page, simply click the “New Check Request” button in the top right corner to get started.

TRANSACTION DETAILS

Vendor: This is the “payee” or who you would like to write the check for. For existing vendors, simply select their name from the dropdown list. To narrow down your vendor list, you can type or scroll to choose from the vendor list. If you don’t see the vendor you’re looking for – you can add a new vendor. For details about adding vendors, check out the next section.
Note: After you type in the name of a new vendor you’re trying to create, you may receive a pop-up alert that the name already exists (the name be used in a customer or employee profile). You can make this unique by changing the nomenclature in various ways. For example, you can change your submission of “John Smith” to either “Smith, John” or “Mr. John Smith”.
Transaction Date: This is the date you would like to recognize the expense for your financials. For example, if today is March 25th and you would like to write a check for your rent for April, you could click the date and select April 1st instead. From here, the Finch App will do the rest of the legwork to account for the expense appropriately.
Address: This is where the check will be mailed once it is approved and printed. Editing this field for both new and existing vendors will change the vendor profile for future check requests.
ADDING A NEW VENDOR

To add a new vendor, start typing their name in the “Select a Vendor” dropdown menu. From there, click “Create [New Vendor]” and fill in the remaining address fields. This vendor will be saved automatically for future check requests.
ADDITIONAL DETAILS

Memo: This is a short message that will appear on the check when it is printed. Important information to include in the memo might be an invoice number, account number, or a short description of what the check is for (i.e. “Invoice #143” or “Pizza party reimbursement”). Keep in mind that there is a character cap, so memos should be brief.
Attachments: Upload any relevant documents you would like saved with this check in the accounting software by dragging and dropping or selecting from your device. These will not be seen by the person receiving the check. Helpful attachments to include for your records include invoices, bills/notices, and any other relevant documentation. You can upload up to 20MB of attachments – supported document types include PDF, PNG, JPEG, Word, or Excel. We do not currently support HEIC or Pages documents.
LINE ITEMS
Line items are a great way to keep your details by check organized. Adding line items split up the details of the payment, and makes it possible to cover several payments to the same vendor in a single check.

Item 1: This line item is required on every check, and represents which account you would like to recognize the expense amount. You can include an optional description for your records, but this description will not be printed on the check. To print a short message on the check, write it as a memo.
Add a Line Item: If you would like to pay a vendor for multiple reimbursements or services, but would prefer that they receive one check, simply add a line item for each separate payment. Within each line item, you can select the account for where you want the amount to be expensed, write a new amount, and include a short description for your records. Note: This does not create multiple checks to the same vendor. Line items will be totaled into one check.
What if I want to send several checks to the same vendor? No problem! To send multiple checks, fill out a new check request for every desired check. For records and organization, it’s recommended to include a memo when sending multiple checks to a single vendor. Invoice numbers and dates are helpful for letting your vendor know what each check is for, as well as for your records in the future.
Deleting Line Items: To delete a line item, click the red trash icon in the top right corner.
WHAT HAPPENS NEXT?
After you’ve submitted your check request, it goes to the next round of approvers. For people at the Requester level, it goes to your organization’s Approvers for review. For Approvers, it goes to the accountants for a final review before being processed.
WHAT IF I’VE MADE A MISTAKE?
It happens! You’ll have a chance to edit and resubmit your check request before it goes to the next round of approvers.

Step 1: Select the “view” icon to the right of the check you would like to edit.

Step 2: Select the “edit” icon in the top left corner. This will take you back to the check request page. From there, make any changes you need to. When you’re done, select the green submit button in the top right corner.
Reviewing Check Requests
Once check requests are submitted, they need to be reviewed by an approver before going on to the accounting team and being printed.
SELECT A CHECK REQUEST

From the main screen, you can see all check requests submitted by requester-level users. To limit your view to only requests you have submitted, use the red toggle switch in the top left corner. To view check requests that are waiting to be reviewed/approved, select “Submitted” from the menu or use the “View” icon to the right of the request you would like to view.

From the check request viewing screen, you can instantly approve, reject, edit, or delete a request.
REVIEWING
This is the check request view screen. See how your check is broken down if it’s divided into multiple line items, what accounts the request is for, memos, and attachments.

APPROVING
To approve a check request, select the green “Check” icon. From here, the request will move on to the accounting team for final review/processing before the check is printed and mailed.
REJECTING
To reject a check request, select the red “X” icon. From here, the request will go back into the requester’s queue under the “Rejected” menu item. After being rejected, the requester can edit and resubmit their request until it is up to the standard of the approver.
EDITING

To edit a request, select the “Pen” icon. The edit screen is similar to the original check request screen. You can add or change any of the existing information, and once you are ready to submit with the respective updates, select the green “Submit” button in the top right corner. Once you submit, the request will be automatically approved and will move on to the accounting team for final review/processing.
DELETING
Deleting a request will delete it for all users. It will not repopulate in the requester’s queue and will be deleted from the database.
Managing your Finch App Account
After you’ve activated your account in the Finch App, you may want to update or change some of your account settings. Select one of the topics below for detailed instructions.
Updating your Email Address

First, navigate to your profile page. Click your name in the top right corner of the screen. From here, you can change your email. Click “Save” to update.
Resetting your Password


To reset your password, go to the login screen. If you are already logged in, you will need to log out. From the login screen, click “Forgot your password?” Once you’re on the new password page, you can enter your email address associated with your account. After clicking “Reset my password” you’ll be emailed a link to reset your password. This ensures that only you can update your login credentials.
Expense Reports: Navigating, Completing, and Approving
Completing and approving expense reports in the Finch App is intuitive and easy. Select one of the topics below for detailed instructions about each step in the process.
Video Tutorial
Watch our video tutorial for a walkthrough of the Expense Report Module in the Finch App!
Navigating the Landing Page
Our expense report landing page is organized by the transaction status. You can toggle between all, open, submitted, rejected, and completed.

NON-APPROVING USERS
Users that are not responsible for approving other individual’s expense reports will be able to see all transactions they have open or submitted along with their current status.
After submitting your expense report transactions, it will be approved or rejected by the direct reviewer on your team before entering the last round of review by the accountants. If you don’t have a user assigned to approve your expense reports, the transactions you submit will be automatically sent to the accountants for review and final bookkeeping.
APPROVING USERS
Approvers will be able to see all expense reports they have submitted as well as expense reports by other individuals in their organization for which they are directly responsible for reviewing. Individuals who do not have a reviewer assigned to their expense reports, their transactions are automatically sent to the accountants for review and processing.
Additionally, Approvers can review, modify, and approve or reject expense reports submitted for approval in the “Submitted” tab.
STATUS UPDATES
All expense report statuses are instantly updated with the exception of “Submitted” statuses. “Submitted” statuses update once the direct approver has reviewed and actioned that expense report transaction to either rejected or completed. Possible statuses and their definitions include:
All: This is an aggregated list of all transactions in your view. If you have are responsible for reviewing other individual’s expense reports, you will see all transactions in any status here, including your transactions.
Open: Not submitted, but ready for you to categorize the transaction.
Submitted: Off to the individual who is assigned to review your expense report transactions.
Rejected: Not approved. You can go back and edit the expense report to re-submit.
Completed: Approved by your direct reviewer (if you have someone assigned to review and approve your expense reports), or completed by you if you don’t have any assigned to review your expense reports.
Completing an Expense Report
SELECTING AN EXPENSE REPORT

View any open expense report by clicking the “view” button on the right side of the expense from either the “Open” tab or “All” tab. From here, you’ll be able to submit or edit the expense. Approvers will also have the ability to approve the expense.
SUBMITTING AN EXPENSE REPORT

Uploading Files: Drag and drop or upload files as documentation for an expense. Things like receipts or invoices are helpful to keep on file for your records.
Line Items: Line items can be helpful if one expense report contains multiple purchases or items that belong to different accounts. Each item can have its own account, amount, and description. All line items must add up to the total amount of the expense report, which is shown at the top of the report. If the “total” amount and the amount “you entered” are not the same, you will not be allowed to submit the expense report.
Account Selection: Choose the appropriate account by using the dropdown menu or typing the name of the account. The Finch App automatically limits available accounts the most common account types: Expense, Cost of Goods Sold, and Other Expense. These accounts will automatically be available in the drop down menu.
Description Field: Fill in the description field with any information that explains the purchase for your records. This information can be helpful to your expense report approver or the Finch team in case there may be a more fitting account for the expense based on your description of the purchase.
What if the account I need is not available? You can email your specific client@finch.co email to request for specific accounts from your Chart of Accounts to be added to your dropdown menu. Account access can be provided to every user in your organization or to specific users so you only see accounts you’ll actually use.
Submitting Your Report: Once all fields are filled in, the green “Submit” button at the top of the page should be clickable. If you cannot click the button, part of the expense report is incomplete and needs to be filled in. After submitting, your report will go to your direct approver. If you are an expense report approver, your report will automatically be approved.
Reviewing Expense Reports
Once expense report transactions are submitted by a user that has a direct approver, they need to be reviewed by that approver before going on to the accounting team for final bookkeeping.
SELECT A TRANSACTION

From the main screen, you can see all expense reports submitted by your direct-report users. To limit your view to only transactions you have, use the red toggle switch in the top left corner. To view expense reports that are waiting to be reviewed/approved, select “Submitted” from the menu or use the “View” icon to the right of the transaction you would like to view.
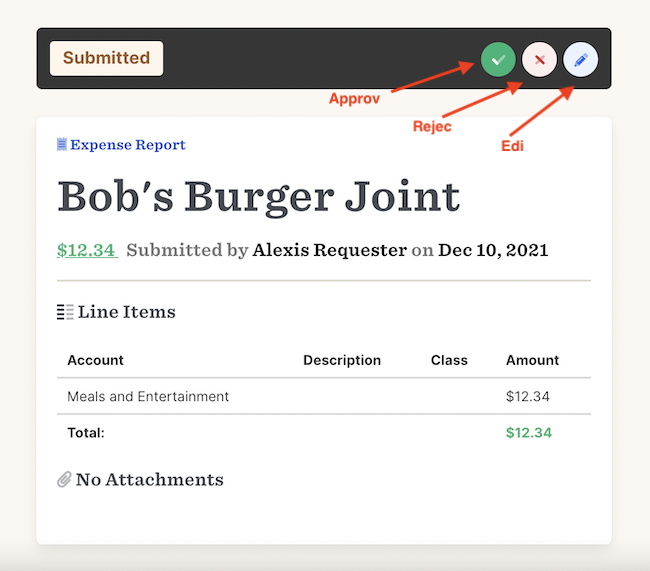
From the expense report transaction viewing screen, you can instantly approve, reject, or edit the submitted transaction.
REVIEWING
This is the expense report view screen. See how the expense report transaction is broken down if it’s divided into multiple line items, what accounts the request is for, and attachments.

APPROVING
To approve an expense report transaction, select the green “Check” icon. From here, the transaction will move on to the accounting team for final review and bookkeeping.
REJECTING
To reject an expense report transaction, select the red “X” icon. From here, the transaction will go back into the user’s queue under the “Rejected” menu item. After being rejected, the user can edit and resubmit their transaction until it is up to the standard of the approver.
EDITING

To edit a transaction, select the “Pen” icon. The edit screen is similar to the original expense report screen. You can add or change any of the existing information, and once you are ready to submit with the respective updates, select the green “Complete expense report” button in the top right corner. Once you submit, the transaction will be automatically approved and will move on to the accounting team for final review and bookkeeping.
Manager User Features
Managers users have the ability to supervise various aspects of the Finch App and the organization’s team members. Select one of the topics below for detailed instructions.
User Profiles
Manage your team’s access within the Finch App by sending invitations, granting or limiting access to particular modules, and viewing open check requests or expense reports.
USERS AT A GLANCE

View all users and get a snapshot of your users’ permissions from the Users tab. To the right of each user’s name is a chart of what they currently have access to, including check requests, reports, and expense reports. This chart also indicates which users are currently active. You can click a user’s name to be taken to their profile.
Note: Users who have been removed from the Finch App will still appear on your list of users, so that you have access to their historical transactions, but their profile page will show that they have no access to any module. Users who have yet to accept their invitation will show as “inactive,” but will become “active” after logging in.
VIEW USER PROFILES

After clicking a user’s name, you’ll be taken to their user profile. From here you can see the email associated with their account and the number of open expense reports or check requests. You can also provide or revoke permissions to different modules of the app by using the toggles in each section.
When giving a user access to expense reports, use the dropdown menu to select an “uncategorized” account determining which account’s transactions they are responsible for categorizing. If you’re unsure or would like some assistance, feel free to email your client@finch.co email with the last four digits of the credit card so an uncategorized account can be made and the card can be connected through Quickbooks.
Changed settings save instantly using the toggle. Once you see the blue banner notification saying “successfully updated user permission”, you are safe to navigate away from the page.
ADDING NEW USERS

From the User landing page, click the green “New User” button in the top right corner.

Managers can send Finch App invitations as well we create other Manager Users. To see the full scope of access that comes with the Manager User feature, check out finch.co/app/manager. In order to send an invitation, all fields in the red box pictured above must be filled in. For role, simply use the dropdown list to select “Client.”
After filling in the user’s contact information, click the red toggle to change it to green (from left to right, respectively) and add permissions to the desired module. Permissions can always be changed after an invitation is sent. Here’s what each module and toggle gives the user access to:
• Expense Reports – Manage their own expenses: For users with a credit or debit card, this feature gives them access to expense reporting, enabling them to provide documentation and categorize expenses as they get sent over by your team of Number Crunchers.
• Expense Reports – Approve team members’ expenses: This allows users to approve or reject expense reports from other users. Once a user has this permission, they are able to be selected as a user’s expense report approver.
• Check Requests – Create check requests: Users with this permission can request checks that will be printed and mailed by Finch.
• Check Requests – Require approval on new Check Requests: Users with this toggle enabled will need an internal approver from your organization to approve the request before it gets reviewed and processed by your Finch team. Users without this toggle enabled will have their check requests automatically approved and sent to your Number Crunchers. Note: Approvers in the Finch App function are within our pool-based approval system. Any user who does not require approval on their check request is considered an Approver and can approve or reject other check requests in the queue. For more information about what Approvers can do, check out “Navigating the Landing Page” above.
• Reports: Users with this toggle enabled can be set to receive your organization’s monthly Finch Reports.
Once the profile permissions are set, you can hit the green “Send Invite” button in the top right corner of the screen. If this button is unable to be clicked, a required field may be missing. If you are giving a user access to expense reports, an expense account must be selected from the dropdown menu in order to send an invitation. For more information on this, see “View User Profiles” in the previous section or email client@finch.co for assistance. Additionally, you can use our access feature at the bottom of the user profile to change which accounts each user has access to at any time. For more information about this feature, check out finch.co/app/access.
Check Requests
In progress…
Expense Reports
In progress…
Finch Reports
Users with this access can view your organizations Finch Reports. As a manager, you can see who has reports access in the Users tab. To fully grant or remove reports access, please reach out to your Finch team at your specific client@finch.co email address.

VIEW YOUR REPORTS
You can view your organization’s reports by navigating to the reports tab and clicking “View” next to the report name. If you have multiple reporting pages, you’ll see them all listed here.
